The “Product Settings” section for Quick Order or eCommerce Order Management System is where users create product groups and product variations that will be displayed in their campaign interface. This allows customers to make their purchasing choices based on the available options.
Step 1: Add a product group, parent, or category, simply click on the “Add Product Category” button located at the top right corner of the product tab.

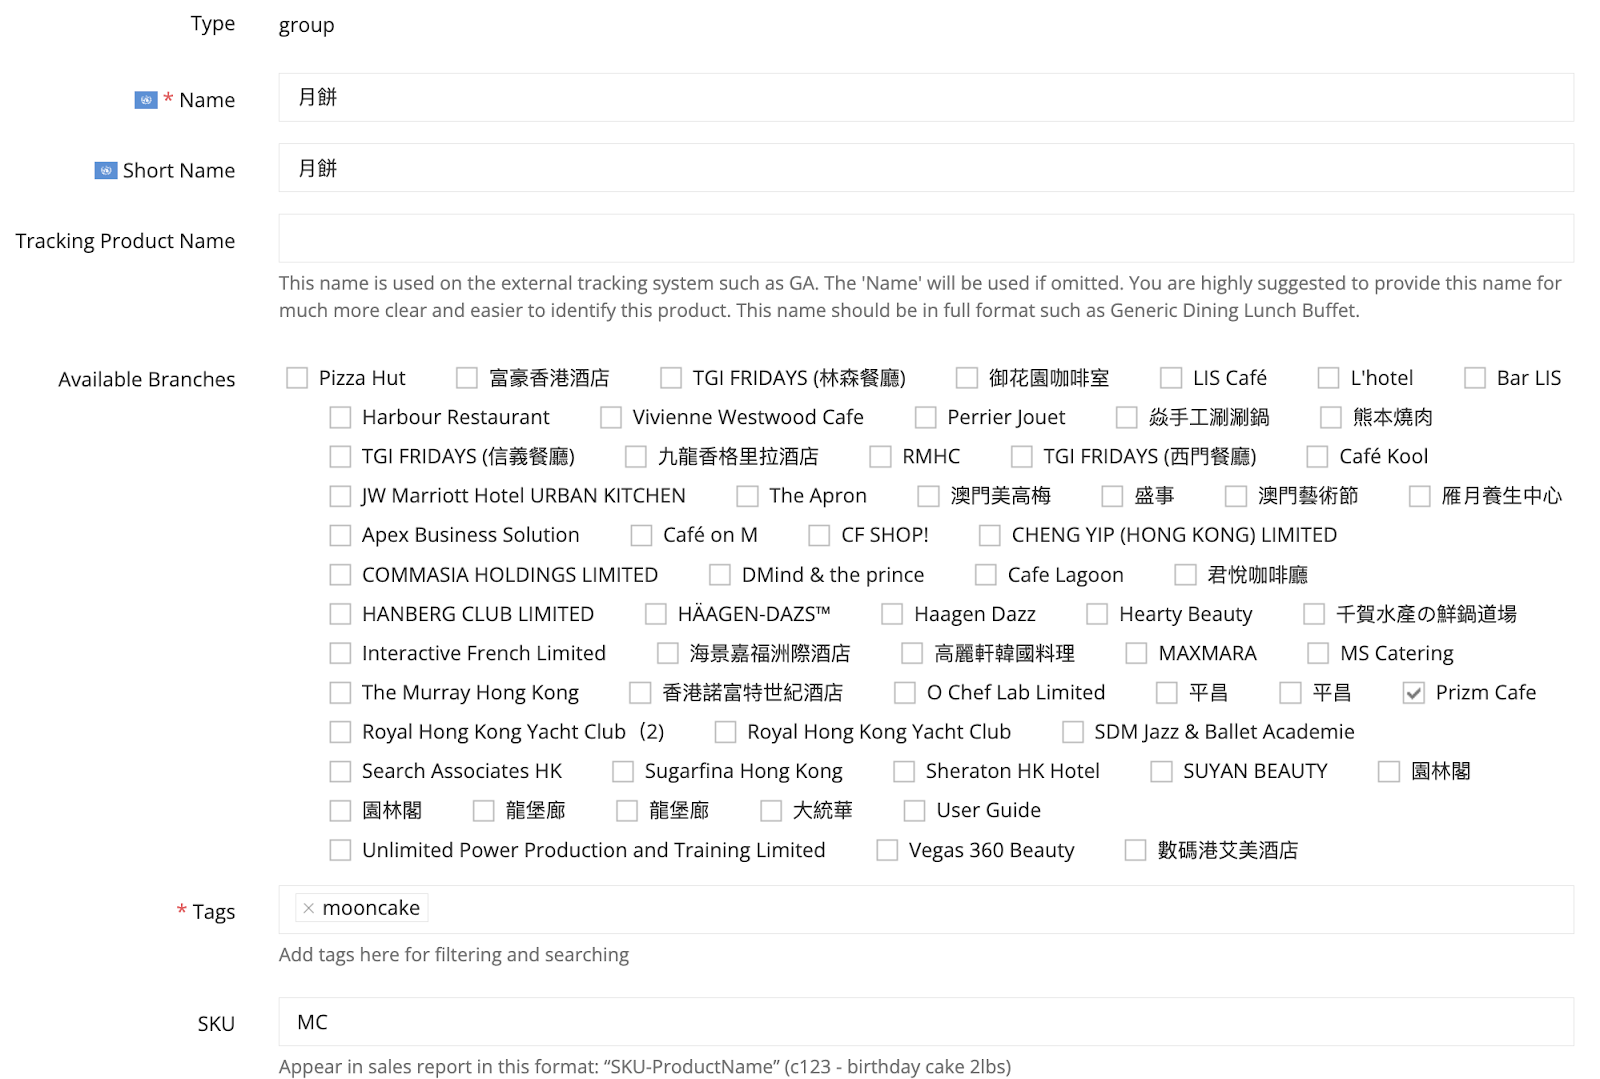
Step 2: Insert the name and short name of the product group.

Step 3: Insert product information of the product group.
Required Fields:
- Tags: Insert relevant tags to facilitate filtering and searching.
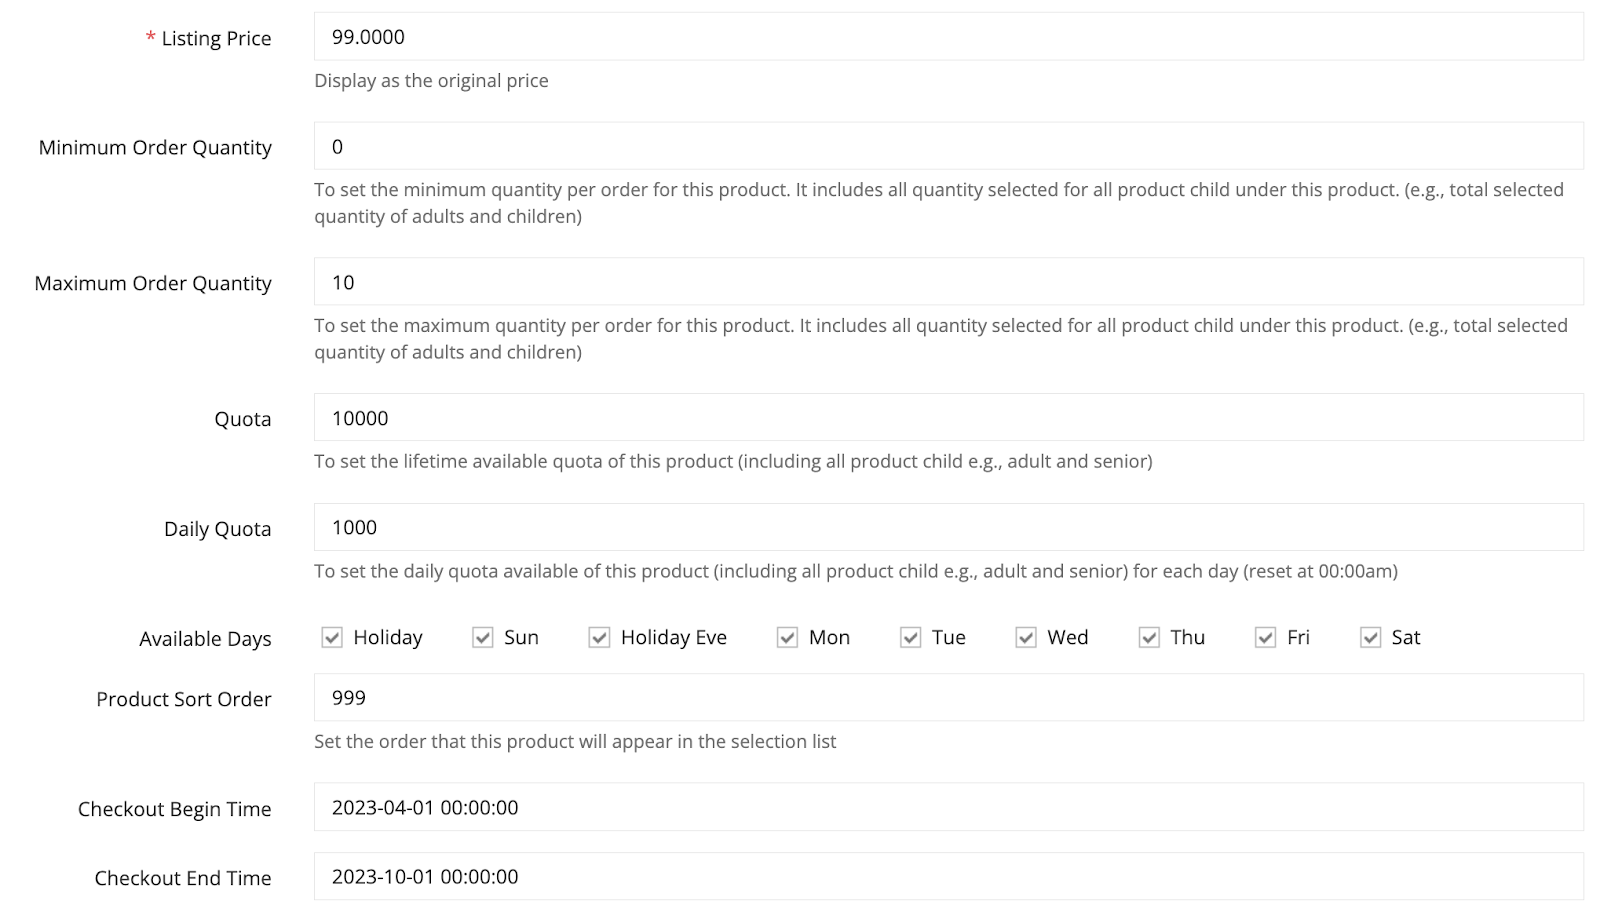
- Listing Price: Insert the price of the product group. However, the product group does not require any price. Feel free to fill in any numbers here.
- Available Branch: Choose the branches that were set HERE, where this product is available. .
- Available Days: Select the days when this product group can be booked. Please choose only from the days already specified in the Product settings.
Optional Fields:
- Tracking Product Name : This field is utilised by external tracking systems like Google Analytics. If left blank, the system will default to using the ‘Name’ field. It is highly recommended to provide a name in this field to enhance clarity and facilitate easier identification of this product. The name should be provided in its complete format.
- SKU : SKU appear in sales report in this format: “SKU-ProductName” (c123 – birthday cake 2lbs)
- Minimum Order Quantity : The minimum quantity per order for this product. It includes all quantities selected for all product children under this product group. The minimum order quantity has to be lesser than or equal to the Quantity starting Value.
- Maximum Order Quantity : The maximum quantity per order for this product. It includes all quantities selected for all product children under this product group.
- Quota : The lifetime available quota of this product (including all product child)
- Daily Quota : The daily quota available of this product (including all product child) for each day (reset at 00:00am)
- Product Sort Orders : Determine the order in which this product group will appear in the landing page.
- Checkout Begin Time : The product group will be available to customers starting from this date.
- Checkout End Time : The product group will not be available to customers after this date.
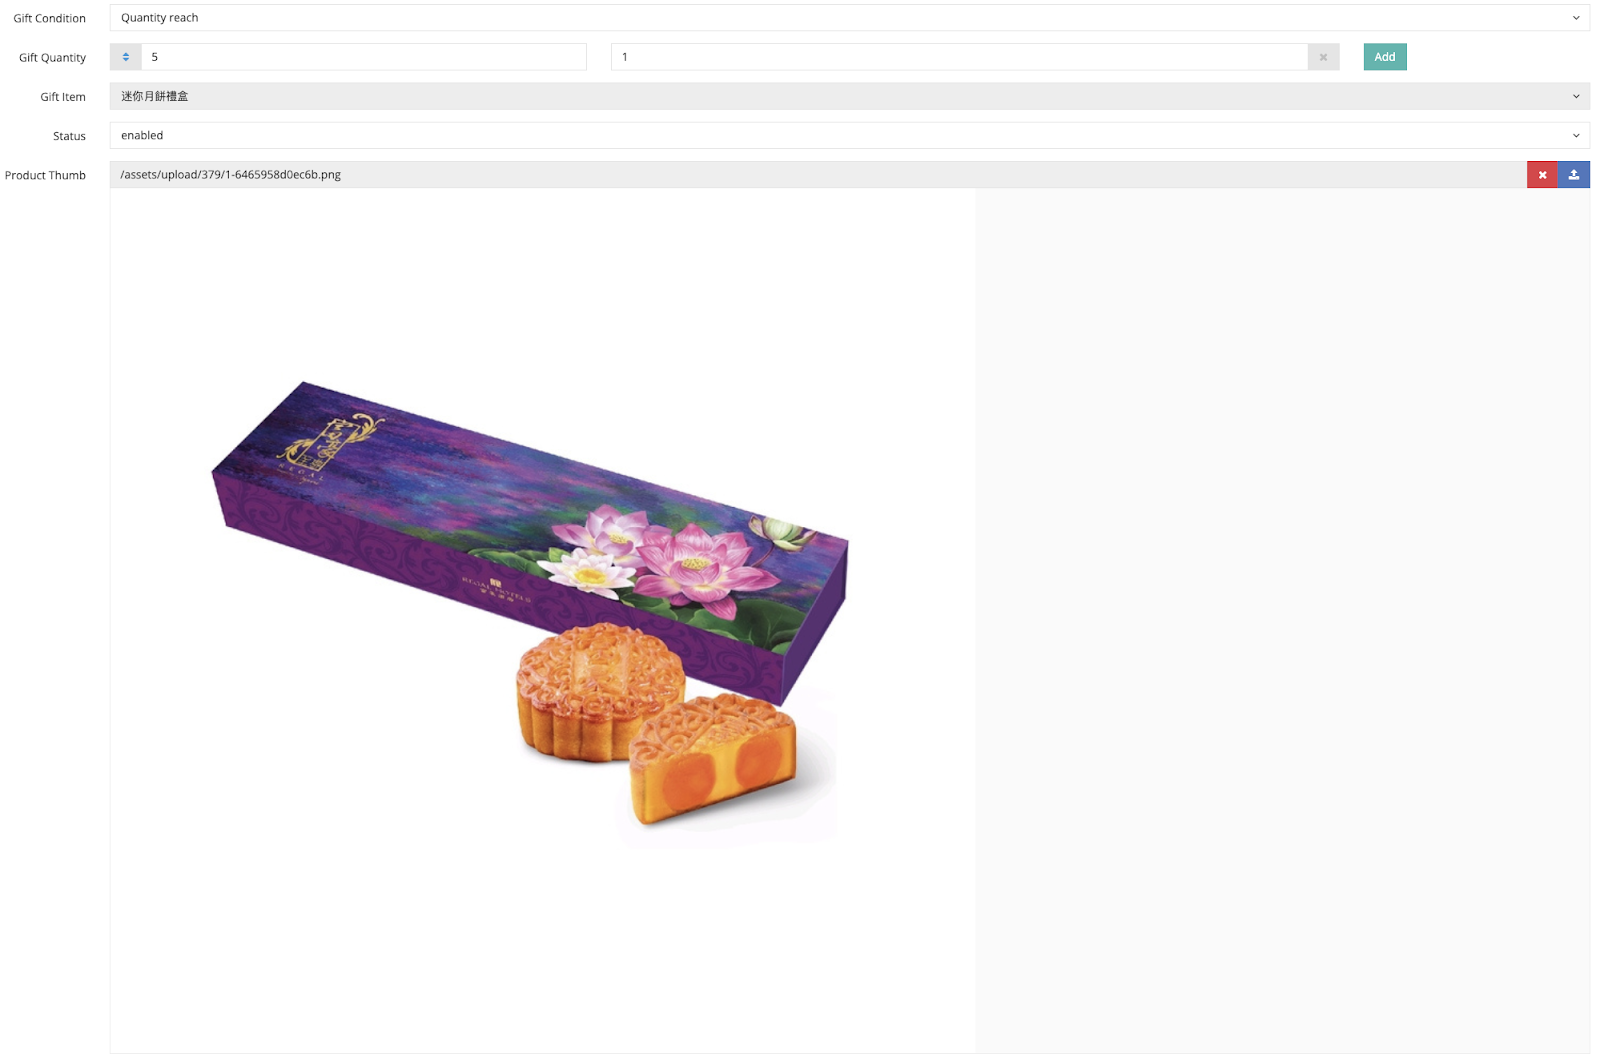
- Gift Condition: Stating the condition(s) when the user will receive the giveaway.
- Gift Quantity: This field will only be displayed when you choose the “Quantity Reach” option in the Gift Condition. Please enter the total Buy Quantity of items that need to be purchased in order to receive the gift. Also, specify the total Gift Quantity of the gift that the purchaser will receive upon reaching the required Buy Quantity.
- Gift Amount: TThis field will only be displayed when you choose the “Amount Exceed” option in the Gift Condition. Please enter the total Amount Reach of items that need to be purchased in order to receive the gift. Also, specify the total Gift Quantity of the gift that the purchaser will receive upon reaching the required Amount Reach.
- Gift Item: Select the giveaway item (details to be set HERE)
- Product Thumb: The image of the product group.
Step 4: Set the status to “enabled” to activate the product group.

Step 5: Click on the “Save” button to save your product group’s settings. You should only create 1 single Product Category for each campaign in this module.

Step 6: To create a product child (the actual product selection), return to the product page and click the “+Add Product” button located within the product group.

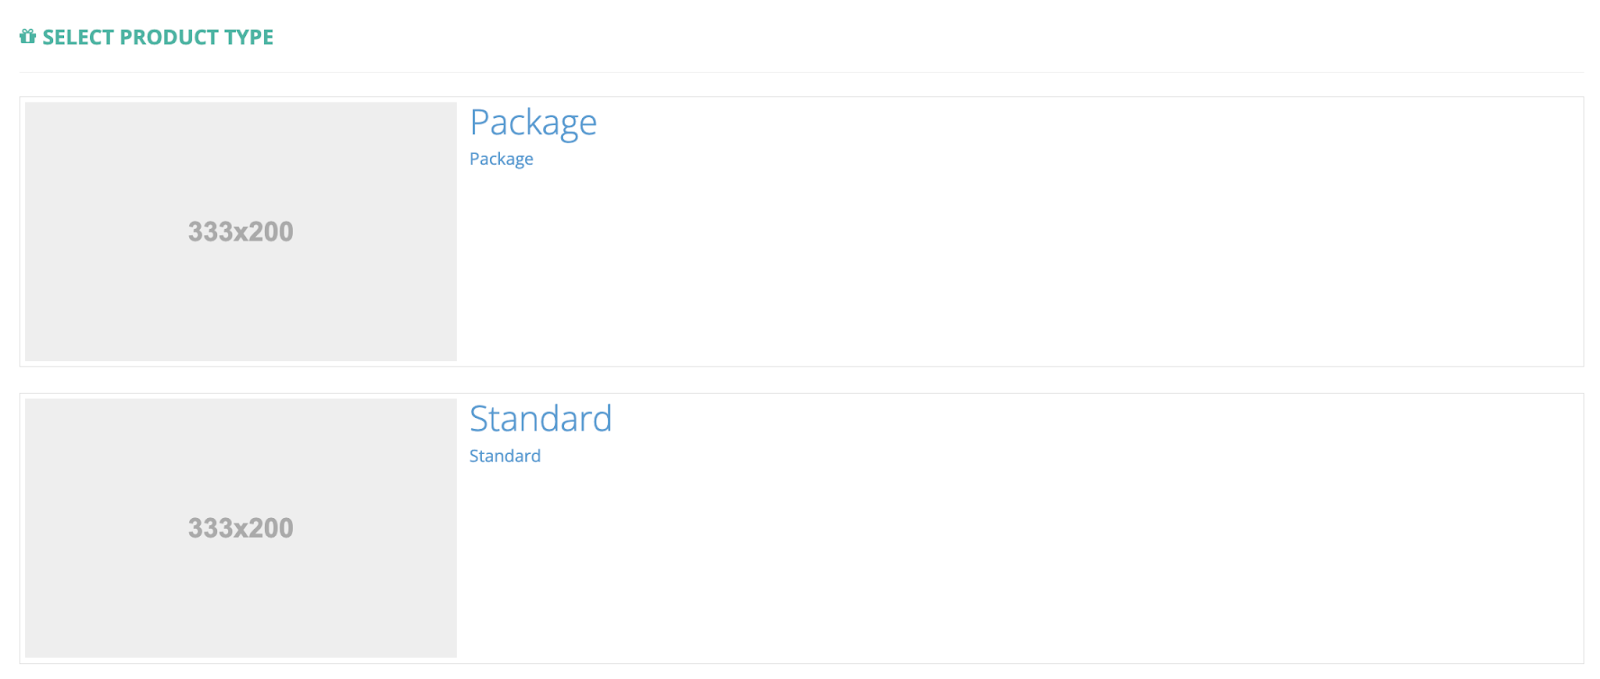
Step 7: Select Product type. In this case, we will select “Standard”.
Step 8: Insert the product settings. Additionally, you have the option to duplicate settings from an existing product to save time and prevent redundancy.
- Name: Insert the name of the product.
- Short Name: Insert the short name of the product.
- SKU: SKU appears in the sales report.
- Currency: Select the currency to be used for this product.
- Prices: Insert the price of the product.

Step 9: Click on the “Save” button to save your product child’s settings.
Step 10: Insert product information of the product child.
Required Fields:
- Tags: Insert relevant tags to facilitate filtering and searching.
- Listing Price: Insert the original price of the product child.
- Discount Price: Insert the discounted price of the product child. Insert the same value as the listing price if no discount is offered.
- Available Branch: Choose the branches that were set HERE, where this product child is available. .
- Available Days: Select the days when this product child can be booked. Please choose only from the days already specified in the Product settings.
Optional Fields:
- Tracking Product Name : This field is utilised by external tracking systems like Google Analytics. If left blank, the system will default to using the ‘Name’ field. It is highly recommended to provide a name in this field to enhance clarity and facilitate easier identification of this product. The name should be provided in its complete format.
- Discount : Insert “90” for a 10% discount, “70” for a 30% discount, similarly to other discount amounts, or leave it blank for no discount, and the discount rate will be applied to the “Discounted Price“.
- Service Charge : Assign a specific service charge for each product individually by entering a numerical value. For example, entering “10” would indicate a service charge of 10%, or you can leave the field blank if no service charge is applicable.
- Descriptions : Text displayed under the product name for customers to learn more about this product.
- Quantity Starting Value : The quantity selector begins from this value. Leave it blank to start from 0.
- Minimum Order Quantity : The minimum quantity per order for this product. The minimum order quantity has to be lesser than or equal to the Quantity starting Value.
- Maximum Order Quantity : The maximum quantity per order for this product.
- Quota : The lifetime available quota of this product (including all product child)
- Daily Quota : The daily quota available of this product (including all product child) for each day (reset at 00:00am)
- Product Sort Orders : Determine the order in which this product child will appear in the landing page.
- Checkout Begin Time : The product child will be available to customers starting from this date.
- Checkout End Time : The product child will not be available to customers after this date.
- Gift Condition: Stating the condition(s) when the user will receive the giveaway (Gifts to be set HERE.
- Gift Quantity: This field will only be displayed when you choose the “Quantity Reach” option in the Gift Condition. Please enter the total Buy Quantity of items that need to be purchased in order to receive the gift. Also, specify the total Gift Quantity of the gift that the purchaser will receive upon reaching the required Buy Quantity.
- Gift Amount: This field will only be displayed when you choose the “Amount Exceed” option in the Gift Condition. Please enter the total Amount Reach of items that need to be purchased in order to receive the gift. Also, specify the total Gift Quantity of the gift that the purchaser will receive upon reaching the required Amount Reach.
- Gift Item: Select the giveaway item (Gifts to be set HERE)
- Product Thumb: The image of the product group. Hint: Optimal image sizes – W480 x H300.